
Setting up your first aquarium can feel overwhelming, especially when you’re faced with equipment you’ve never used before. The pump is one of the most important pieces of equipment in your tank. It keeps the water moving, helps with filtration, and ensures your fish have enough oxygen to thrive. Fortunately, installing a pump isn’t as complicated as it might seem.
This beginner aquarium guide will walk you through every step of the process. Whether you’ve just purchased your first tank or you’re replacing an old pump, you’ll find clear instructions that make the installation straightforward. By the end of this article, you’ll feel confident about setting up your pump and maintaining a healthy environment for your aquatic pets.
Understanding Why Your Aquarium Needs a Pump
Before diving into installation, it’s helpful to understand what a pump actually does. This knowledge will help you appreciate why proper setup matters so much.
An aquarium pump creates water circulation throughout your tank. This movement serves several critical purposes. First, it helps distribute oxygen evenly, which your fish need to breathe. Stagnant water quickly becomes oxygen-depleted, especially in the lower areas of your tank.
Second, pumps work with your filtration system to remove waste and debris. They pull water through filter media that traps harmful substances. Without this circulation, toxins would build up and endanger your fish.
Third, water movement prevents the formation of dead zones where bacteria can grow unchecked. It also helps maintain consistent water temperature throughout the tank. Additionally, many fish species come from rivers or streams and actually prefer some water movement.
Choosing the Right Pump for Your Tank
Not all pumps are created equal. Selecting the appropriate pump for your specific aquarium is the first step toward successful installation.
Tank size is the primary factor to consider. Pumps are rated by how many gallons per hour they can process. A general rule suggests your pump should circulate the total water volume at least three to five times per hour. For example, a 20-gallon tank needs a pump rated for 60 to 100 gallons per hour.
However, this guideline varies based on your tank inhabitants. Fish that prefer calm water, like bettas, do better with gentler flow. Active swimmers or fish from fast-moving waters appreciate stronger currents. Research your specific fish species to determine their preferences.
Consider whether you want an internal or external pump. Internal pumps sit inside your tank and are generally quieter and easier to install. External pumps stay outside the tank and are typically more powerful. For beginners, internal pumps are usually the better choice because they require less complicated setup.
Noise level matters if your aquarium is in a bedroom or quiet space. Read reviews and look for pumps specifically marketed as quiet or silent. Some models have adjustable flow rates, which gives you flexibility as your aquarium matures.
Gathering Your Supplies Before Starting
Having everything ready before you begin makes the installation process smoother. There’s nothing more frustrating than getting halfway through and realizing you’re missing a crucial item.
You’ll need your pump, obviously, along with any tubing or attachments that came with it. Most pumps include suction cups or mounting brackets for securing them in place. Check the box to ensure all advertised parts are present.
A clean towel is essential for wiping up spills. No matter how careful you are, some water will likely splash during installation. Keep paper towels or a cloth nearby.
If your pump requires assembly, you’ll need any tools specified in the instructions. Some models snap together without tools, while others might require a screwdriver. Check the manual before starting.
Having a bucket on hand is wise, especially if you need to remove water to access certain areas of your tank. You might also want aquarium-safe gloves if you’re sensitive about putting your hands in tank water.
Finally, make sure your power outlet is nearby and protected from water splashes. Aquarium equipment should always plug into a GFCI outlet for safety.
Preparing Your Aquarium for Pump Installation
Proper preparation prevents problems and makes installation go more smoothly. These pump setup steps ensure you’re starting with the right foundation.
First, unplug all electrical equipment connected to your tank. Safety should always be your top priority when working with water and electricity. Even though you’ll be careful, accidents can happen.
If you’re installing a pump in an established tank, observe your water level. The pump needs to be fully submerged to work correctly and avoid damage. If your water level is low, add dechlorinated water before proceeding.
Clean the area where you plan to install the pump. Algae or debris on the tank glass will prevent suction cups from adhering properly. Use an aquarium-safe scraper or cloth to clean the spot thoroughly.
For new tanks that aren’t yet filled, decide on pump placement before adding water. This is much easier than trying to position it later. Consider where the pump will be least visible while still providing optimal water circulation.
Think about the direction of water flow. Most pumps have an outlet that directs water in a specific direction. You want this flow to circulate throughout the tank, not just blast one corner. Positioning the pump on one end and aiming the flow toward the opposite end often works well.
Installing an Internal Aquarium Pump
Internal pumps are the most common choice for beginners. These pump setup steps will guide you through the installation process.
Start by assembling the pump according to the manufacturer’s instructions. Some pumps come pre-assembled, while others require you to attach the filter cartridge or intake tube. Follow the diagrams in your manual carefully.
Once assembled, wet the suction cups. Dry suction cups don’t stick well to glass. A quick dip in water activates them and ensures a strong hold. Press the pump firmly against the tank wall in your chosen location.
Make sure the pump sits completely underwater. The water line should be well above the pump’s top. If it’s too close to the surface, the pump might suck in air, which creates noise and reduces efficiency.
Check that the intake isn’t blocked by decorations or plants. The intake is where water enters the pump, and it needs clear access to surrounding water. Leave at least a few inches of space around it.
Position the outflow nozzle to create desired water movement. Some aquarists aim it at the surface to increase oxygen exchange. Others prefer directing it along the back wall to create circulation without disturbing fish. Experiment to find what works best for your setup.
Secure any tubing if your pump uses it for intake or outflow. Make sure tubes aren’t kinked or bent sharply, as this restricts flow. Route them neatly along the back or side of the tank where they’re less visible.
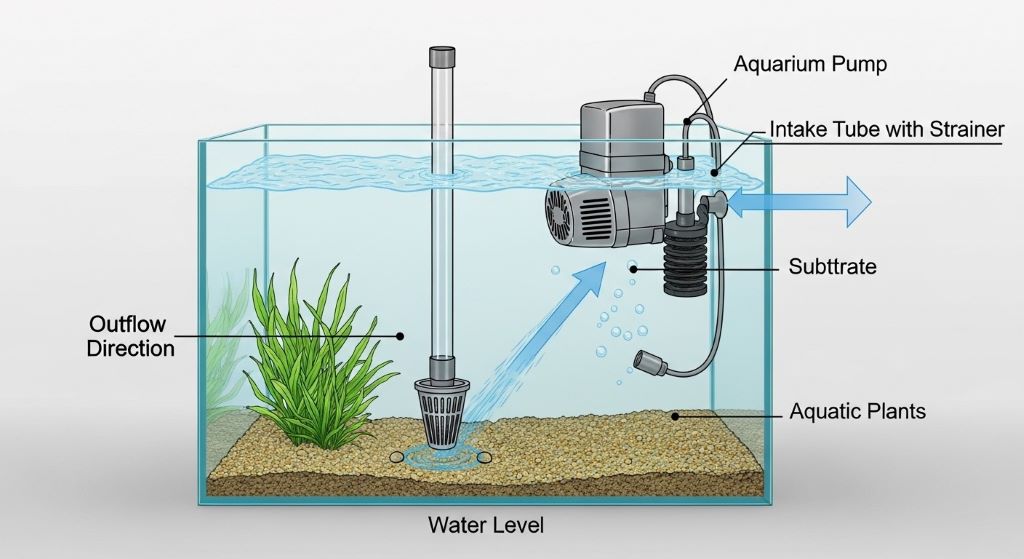
Setting Up an External Aquarium Pump
External pumps require a bit more work but offer advantages for larger tanks. This section covers the installation process for these models.
Place the pump near your aquarium but below the water level if possible. This positioning helps with priming and reduces strain on the pump. Make sure it’s on a stable, level surface that can get wet without damage.
Attach the intake tube to the appropriate port on the pump. This tube will go into your tank and draw water out. The intake usually has a strainer on the end to prevent debris from entering the pump.
Connect the outflow tube to the pump’s output port. This tube returns filtered water to the tank. Make sure all connections are tight to prevent leaks. Some pumps use quick-disconnect fittings, while others require clamps.
Submerge the intake tube in your aquarium. Position it where it won’t disturb your substrate or decorations. The intake should be well below the water surface but not sitting on the bottom where it might suck up gravel.
Place the outflow tube back into the tank. Position it to create good circulation. Many people use a spray bar attachment on the outflow to spread the returning water across a wider area.
Check all tubing for kinks or bends that could restrict flow. The tubes should run as straight as possible between the tank and pump. Use clips or holders to keep them organized and secure.
Priming Your Pump for First Use
Most pumps need priming before they’ll work correctly. This process removes air from the system and gets water flowing.
For internal pumps, priming is usually automatic. Once you plug it in, water begins flowing through immediately. However, you might notice some air bubbles initially. This is normal and should stop within a few minutes.
External pumps often require manual priming. Fill the pump chamber with water using a pitcher or by siphoning from the tank. This initial water helps create the suction needed to start flow. Some external pumps have a primer button you press several times to draw water in.
Once you think the pump is primed, plug it in and watch for water flow. You should see or hear water moving within seconds. If nothing happens after 30 seconds, unplug it and check for air locks or blockages.
Look for leaks around all connection points. A few drops during initial startup are normal, but continuous leaking indicates a problem. Tighten connections or check that seals are properly seated.
Listen to the pump’s sound. A properly running pump produces a quiet hum. Loud rattling, clicking, or grinding sounds suggest something is wrong. Unplug it immediately and check for obstructions or installation errors.
Adjusting Water Flow for Your Fish
Once your pump is running, you’ll need to adjust the flow rate to suit your aquarium inhabitants. This fine-tuning makes a significant difference in your fish’s comfort.
Many modern pumps have adjustable flow controls. Start with a medium setting and observe your fish. They should swim normally without being pushed around by the current. If they’re struggling or hiding constantly, the flow is too strong.
Watch the water surface. Gentle ripples are good and promote oxygen exchange. However, excessive turbulence can stress fish and splash water out of the tank. Aim for a balance that keeps water moving without creating a whirlpool.
Different areas of your tank will have different current strengths. Create a varied flow pattern so fish can choose their preferred areas. Some might enjoy swimming in the current, while others prefer calmer zones behind decorations.
For fish that dislike strong currents, you can baffle the outflow. Placing a sponge over the outlet or directing flow against the tank wall reduces current intensity while maintaining necessary circulation.
Monitor your fish over the next few days. They’ll tell you if the flow needs adjustment through their behavior. Stressed fish hide constantly, gasp at the surface, or struggle to swim. Happy fish explore the tank and eat normally.
Maintaining Your Aquarium Pump
Regular maintenance keeps your pump running efficiently and extends its lifespan. Fortunately, pump maintenance isn’t complicated or time-consuming.
Clean the intake regularly to prevent clogs. Debris accumulation reduces flow and makes the pump work harder. Most intakes have a sponge or strainer that you can remove and rinse in tank water. Never use tap water, as chlorine damages beneficial bacteria.
Check the impeller monthly. This is the part inside the pump that spins to create water movement. Remove it according to your manual’s instructions and rinse away any accumulated slime or debris. A clean impeller runs more quietly and efficiently.
Inspect all tubing and connections for wear. Replace cracked or brittle tubing before it starts leaking. Check that suction cups are still holding firmly. They can lose grip over time, especially if they’ve been exposed to algae growth.
Monitor your pump’s performance. If flow seems reduced or noise increases, it’s time for cleaning or possible replacement. Pumps don’t last forever, but proper maintenance can give you years of reliable service.
Keep spare parts on hand if possible. Having an extra impeller or filter cartridge means you can do emergency repairs without waiting for online orders. This preparation prevents disruptions to your tank’s filtration.
Troubleshooting Common Pump Problems
Even with careful installation, you might encounter issues. Here’s how to address the most common problems beginners face.
If your pump isn’t turning on, check the obvious first. Is it plugged in? Is the outlet working? Try a different outlet to rule out electrical issues. Check for a reset button on the pump itself.
No water flow despite the pump running suggests an airlock. Unplug the pump, shake it gently to dislodge trapped air, and plug it back in. For external pumps, you might need to re-prime the system.
Excessive noise usually indicates the pump is running dry or the impeller is damaged. Make sure the pump is fully submerged. If it is, check the impeller for damage or debris.
Weak flow happens when the filter is clogged or the impeller is dirty. Clean both thoroughly. Also verify that tubing isn’t kinked and that the pump’s flow adjustment isn’t set too low.
Leaking connections need immediate attention. Unplug the pump and tighten all fittings. Check that rubber gaskets are in place and not damaged. Replace any worn seals.
Understanding Safety Considerations
Working with electricity and water requires respect for safety protocols. These precautions protect both you and your aquarium inhabitants.
Always unplug equipment before putting your hands in the tank. This simple rule prevents electrical shock. Make it an automatic habit every time you perform maintenance.
Use a drip loop with your power cord. This is a downward curve in the cord below the outlet level. If water runs down the cord, it drips off the loop instead of reaching the outlet.
Never run a pump without water. Dry running damages the motor and can cause overheating. If you need to empty your tank, unplug the pump first.
Keep your pump’s manual in a safe place. You’ll need it for troubleshooting and maintenance instructions. Take a photo of it with your phone for easy reference.
Supervise your pump during the first few hours of operation. Stay nearby to catch any problems early. Once you’re confident everything works correctly, you can relax.
Planning for Long-Term Success
Installing your pump correctly sets the foundation for a healthy aquarium. However, long-term success requires ongoing attention and care.
Develop a maintenance schedule for all your aquarium equipment. Write down when you clean filters, test water, and check equipment. Consistency prevents problems before they start.
Learn to recognize changes in your pump’s behavior. Unusual sounds or reduced flow often signal developing issues. Addressing these early prevents complete failure and potential harm to your fish.
Join aquarium communities online or in person. Other hobbyists share valuable experience and can help when you encounter unfamiliar problems. This beginner aquarium guide is just the start of your learning journey.
Consider keeping a journal of your aquarium activities. Note when you clean equipment, perform water changes, or notice anything unusual. This record helps identify patterns and troubleshoot problems.
Invest in backup equipment as your budget allows. Having a spare pump means you can immediately replace a failed unit without leaving your fish without filtration. This preparation provides peace of mind.
Conclusion
Installing an aquarium pump doesn’t have to be intimidating for beginners. By following these pump setup steps carefully, you can establish proper water circulation that keeps your fish healthy and happy. Remember that the key elements include choosing the right pump for your tank size, positioning it correctly for optimal water flow, and maintaining it regularly to ensure long-term performance.
Take your time during installation and don’t hesitate to consult your pump’s manual for specific instructions. Every pump model has unique features, and manufacturers provide guidance tailored to their products. Once installed correctly, your pump will quietly work in the background, creating the water movement and filtration your aquarium needs to thrive.
Regular maintenance and observation will help you catch potential problems early. As you gain experience, you’ll develop an intuition for how your pump should sound and perform. This knowledge allows you to provide the best possible environment for your aquatic pets while enjoying the beauty and tranquility of your aquarium.
Frequently Asked Questions
How long should I run my aquarium pump each day?
Your aquarium pump should run 24 hours a day, seven days a week. Continuous operation maintains constant water circulation and filtration, which are essential for fish health. Turning the pump off even for a few hours can allow toxins to build up and oxygen levels to drop dangerously low. The only time to turn off your pump is during feeding or when performing maintenance.
Can I install a pump in a tank that already has fish?
Yes, you can install a pump in an established tank with fish present. However, work carefully to minimize stress. Move decorations gently, avoid sudden movements, and try to complete the installation quickly. The fish might hide initially when you turn on the pump, but they’ll adjust within a day or two to the new water movement.
What should I do if my pump stops working suddenly?
First, check that it’s still plugged in and the outlet has power. If the pump has power but isn’t running, unplug it immediately. Check for visible blockages in the intake or impeller area. Clean thoroughly and try again. If it still doesn’t work, you may need a replacement. Keep fish safe by performing a large water change and using an air stone for temporary oxygenation.
How do I know if my pump is too powerful for my tank?
Signs of excessive flow include fish constantly struggling against the current, hiding behind decorations, or being pushed around the tank. You might also notice substrate being blown around or plants getting uprooted. If your pump has adjustable flow, reduce it. Otherwise, you can baffle the output or consider replacing the pump with a less powerful model designed for your tank size.
Do I need a separate air pump if I have a water pump?
Generally, no. A properly sized water pump creates enough surface agitation to oxygenate your tank adequately. However, some situations benefit from additional aeration. Heavily stocked tanks, tanks with high water temperatures, or aquariums with large fish may need supplemental oxygen. If you notice fish gasping at the surface, consider adding an air stone along with your water pump.
Related Topics:
What to Spray on Grass That Looks Pale
Spring Cleaning Tips That Go Beyond the Surface